
Many homes in the Kathmandu Valley keep their water in two tanks: one under the ground, filled from the pipe or a tanker, and one on the roof, which the taps draw from. A pump lifts the water up. Someone has to switch the pump on, climb up again and again to see whether the roof tank is full, and switch it off. Often the tank overflows anyway, or the pump runs on with no water and burns out.
In many homes a small box beside the pump does this job instead: a water level controller. Wires run from it into both tanks. When the roof tank runs low, it switches the pump on. When the tank is full, it switches it off. If the tank below is empty, it beeps and leaves the pump off. Nobody has to watch it. Inside is a circuit that follows a few rules, and in many newer controllers the rules are a program on a tiny computer. It is a program like yours, except that its inputs come from the real world, and its outputs change the real world.
In this unit you will program a small computer like that: a board with 25 lights, two buttons, sensors for light, temperature, movement and sound, and a speaker. A working copy of it is drawn on this page, and you program it in Python. By the end you will have built a night light, a thermometer, a step counter and an alarm for a drawer, and designed a device of your own.
Computers that sense and act
In Grade 6 you met embedded computers: small computers built into other machines, like the one in a rice cooker or a traffic light. They have no keyboard and often no screen. They take in data from sensors (Grade 6) and buttons, follow their program, and switch things on and off.
Writing programs for computers like these, which sense the world around them and act on it, is called physical computing. A phone app works on a screen; a physical computing program makes a pump run, a light come on at dusk, or a buzzer sound when a door opens.
Every such device has the same three parts:
- Inputs: the sensors and buttons that tell the program about the world. A sensor measures something by itself: how bright it is, how hot, how the device is moving, whether the water has reached the top of the tank.
- The program: the rules that decide what to do.
- Outputs: what the program switches or changes in the world: lights, a buzzer or speaker, a motor, a heater, a screen.
So a device can be described as inputs → program → outputs. Here is the water level controller from the start of the unit, described that way.
The controller’s own outputs are tiny, far too weak to run a pump. So it switches a relay: a switch worked by electricity, where a small current from the controller turns on the big current the pump’s motor needs. Many devices you will meet have one.
An automatic street light switches itself on when it gets dark. Which part is its input?
Pick an answer to see why.
A whole computer on one chip
The computer inside a device like this is usually a single chip called a microcontroller. It holds everything a computer needs (Grade 7, Unit 1): a processor, memory, storage for its program, and pins, tiny metal legs that inputs and outputs are connected to.
A microcontroller is far slower and smaller than a phone’s processor, but it doesn’t need to be fast. It runs one program, the same one, all day, every day, and it costs little and uses very little electricity, so a battery can keep it going for a long time. There are billions of them around us: in remote controls, washing machines, toys, cars, lifts, chargers and phones themselves.
Which is true of a microcontroller?
Pick an answer to see why.
Meet the board
To learn physical computing, students around the world use small boards made for schools. On one board are a microcontroller and the most useful inputs and outputs, ready to use, with no wires to connect. The best known is the micro:bit, about the size of a credit card cut in half.
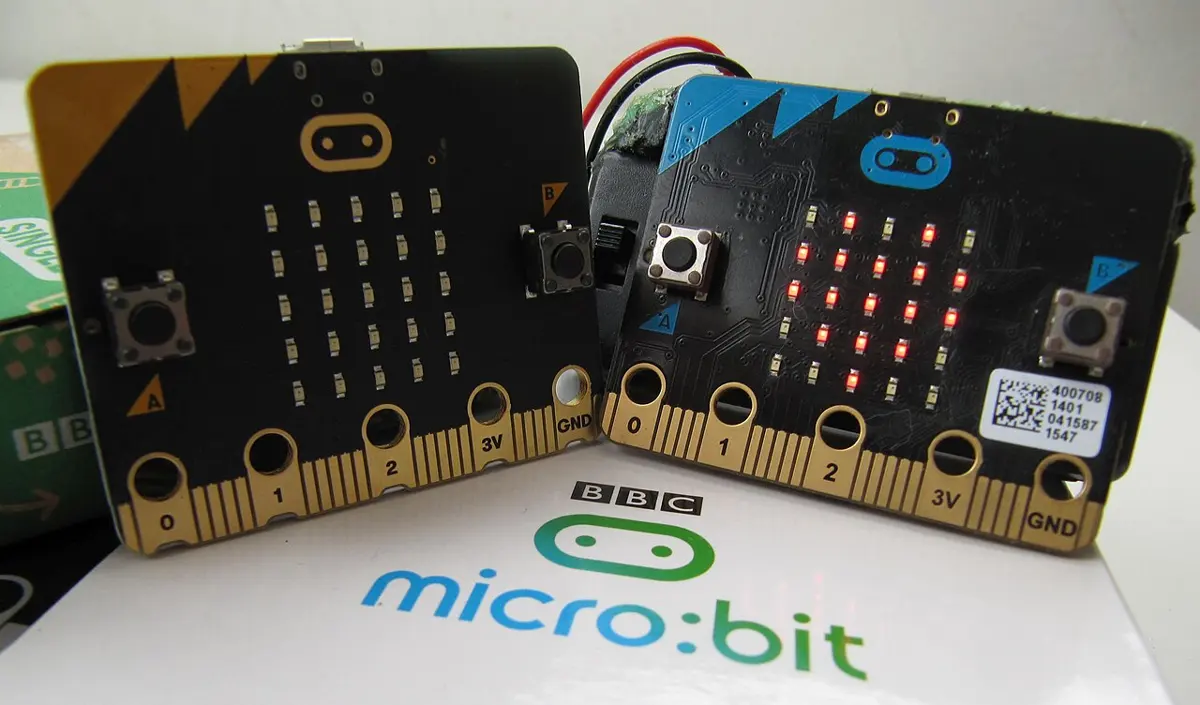
On the front of a micro:bit are:
- 25 LEDs in a grid of 5 rows and 5 columns. An LED (light-emitting diode) is a tiny, efficient light. Together they show letters, numbers and small pictures.
- Buttons A and B, on the left and right.
- The edge connector along the bottom: gold strips and five large holes. Wires or crocodile clips on the holes connect other inputs and outputs: a motor, a bigger light, a soil moisture sensor.
On the back are the processor, the sensors (a movement sensor, the accelerometer you met in a phone in Grade 7, a compass, a microphone), a small speaker, the USB socket for the cable to a computer, and a socket for a battery pack. The board measures light with its LEDs and temperature inside its processor, as you will see.
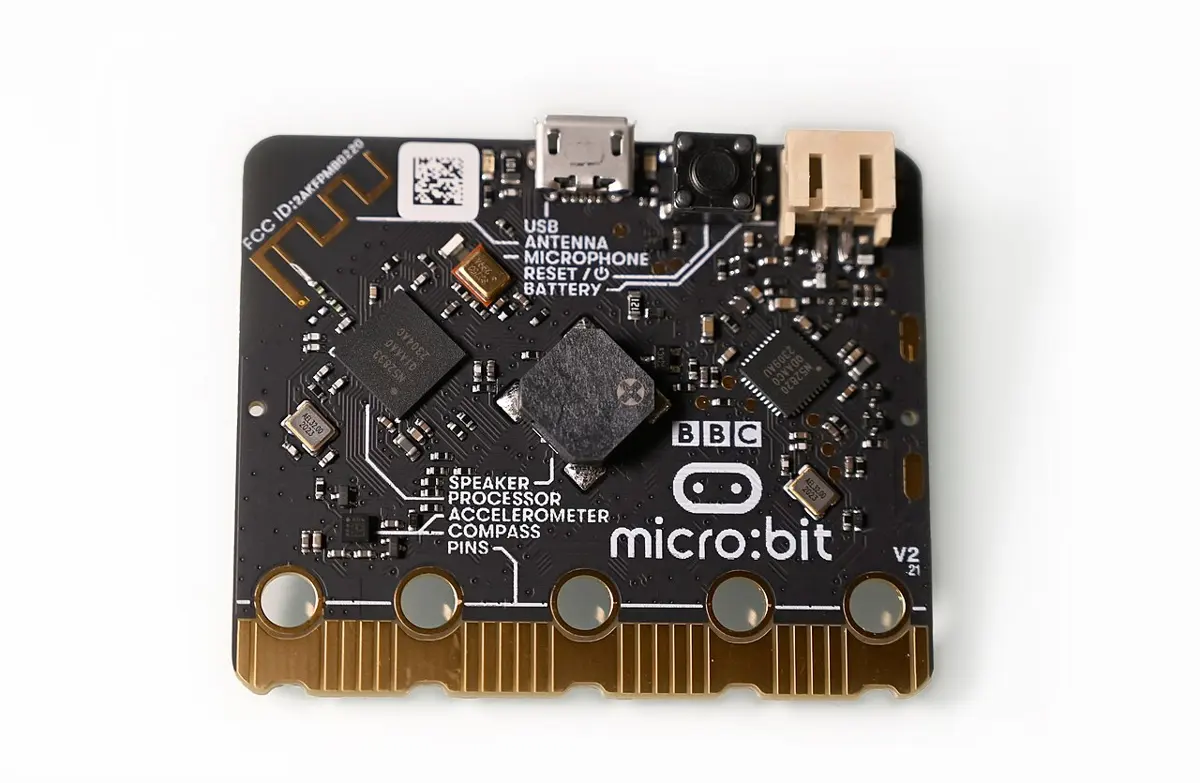
The board on this page
You probably don’t have a micro:bit, and you don’t need one. The board below is drawn from a micro:bit V2: the same 25 LEDs, the same buttons A and B in the same places. It runs the same programs.
Its programs are written in MicroPython, a version of Python small enough to fit on a microcontroller. It is the Python you learned in Unit 1, with extra modules (Unit 2: ready-made sets of tools) for the board: display for the LEDs, button_a and button_b, and the sensors. A program that works on this page also works on a real micro:bit, unchanged.
To use the board:
- Press ▶ Run. The program is sent to the board and starts. While it runs, the button becomes ■ Stop.
- Press A and B on the drawn board with your finger or the mouse. A button stays pressed for as long as you hold it, as a real one does.
- If the program uses a sensor, a slider under the board stands in for the world: drag it to make the room darker or hotter, or tilt the board.
- Tap the program to change it, as in Unit 1. Reset program brings back the book’s version.
- Anything the program prints appears in the dark box under the program, and so does any error message.
The first time you press Run, the page downloads Python, as in Unit 1: about 6 MB, once. After that it starts quickly.
Line by line:
from microbit import *brings in everything the board’s modules have:display, the buttons, the sensors,Image,sleep. Without this line Python doesn’t know any of them, and the next line stops with aNameError. Every program for the board starts with it.display.scroll("Namaste")slides the text across the LEDs from right to left, one column at a time, because only one letter fits at once.display.show(Image.HEART)shows a picture.Image.HEARTis one of the board’s built-in pictures. There are over 60, among themImage.HAPPY,Image.SAD,Image.YES,Image.NO,Image.ARROW_N(an arrow pointing up, north),Image.HOUSE,Image.DUCKandImage.SKULL.
When the last line has run, the program has ended, but the LEDs keep showing the heart until something changes them.
A student’s board program has just one line: display.scroll("Hi"). It stops with NameError: name 'display' is not defined. What is missing?
Pick an answer to see why.
Lights: the LED display
Each of the 25 LEDs has an address, made of two numbers. x counts across, from 0 at the left to 4 at the right. y counts down, from 0 at the top to 4 at the bottom. Counting starts at 0, as it often does in programming.
To light one LED, write:
display.set_pixel(3, 1, 9)The three numbers are x, y and the brightness, a whole number from 0 (off) to 9 (the brightest). Each LED is one pixel of the display, a picture of 5 × 5 pixels, just as the pictures you made from pixels in Grade 6.
Which LED does display.set_pixel(4, 0, 9) light?
Pick an answer to see why.
Your own pictures
Setting 25 LEDs one at a time is slow. Instead, a whole picture can be written as five rows of five digits, each digit one LED’s brightness, with : between the rows:
boat = Image("00900:00990:00900:99999:09990")Read it row by row, from the top: a mast and a flag, the mast again, the deck, and the boat underneath. boat is a variable, as in Unit 1, and it holds an Image.
Moving pictures
A picture that changes is an animation: one picture, a pause, the next picture, a pause, again and again. Two new things make it:
sleep(500)makes the program wait for 500 milliseconds, half a second. A millisecond (ms) is a thousandth of a second, sosleep(1000)waits one second.while True:repeats the lines indented under it forever (Unit 2):Trueis always true, so the loop never stops.
A program on a phone ends when you close the app. A program on a microcontroller usually never ends: its loop goes round from the moment the device is switched on until it is switched off. The water tank controller has been asking “is the roof tank low?” all day, every day, since it was installed.
How long does sleep(2500) wait?
Pick an answer to see why.
Buttons: reacting to input
A program that only shows pictures isn’t reacting to anything. Buttons are the simplest input: each one is either pressed or not.
button_a.is_pressed() asks the board whether button A is being pressed at this moment. It answers True or False, a bool, as in Unit 1. So it can be the condition of an if (Unit 2):
How does the program notice the press so quickly? The while True loop goes round and round, asking about the buttons every time, hundreds of times a second. Checking an input again and again like this is called polling. It is how a microcontroller notices most things: it asks, over and over, much faster than anything in the world changes.
In Grade 6 your block programs had when blocks that waited for an event, such as a key being pressed. Block editors for boards have them too (“on button A pressed”). Underneath, the board’s software is still checking the button again and again, and runs your blocks when the check finds it pressed.
Counting presses
At a school function, someone at the gate clicks a hand counter each time a guest comes in. A board can do that job. But a counter must count each press exactly once, and is_pressed() can’t do that: a press lasts a moment, while the loop goes round many times, so the program would see the same press again and again.
For counting, there is button_a.was_pressed(). It answers True if A has been pressed since the last time the program asked, and then forgets that press. One press gives one True, however long the finger stays down. It also catches a quick press that came while the program was busy, in a sleep or a scroll.
The line count = count + 1 adds one, as in Unit 1, and display.scroll(count) scrolls the number: scroll and show turn a number into text by themselves.
A program must count how many times a student presses button B. Which should it use?
Pick an answer to see why.
Sensors: measuring the world
A button has only two states: pressed or not, True or False. An input like that, which is either on or off, is called digital.
Most things in the world are not just on or off. Light can be anything from a dark room to bright sun; a temperature can be 12.5 °C or 31 °C or anything between. A quantity that can take any value in a range is called analog. A sensor measures an analog quantity, and the board turns the measurement into a whole number the program can use.
The board has these sensors:
| Sensor | What it measures | In MicroPython | It gives |
|---|---|---|---|
| light | how bright it is around the board | display.read_light_level() |
0 (dark) to 255 (bright) |
| temperature | how hot the board is | temperature() |
degrees Celsius, a whole number |
| accelerometer | movement, and which way is down | accelerometer.get_x() |
about −1024 to 1024 when tilted; accelerometer.was_gesture("shake") gives True after a shake |
| microphone | how loud it is around the board | microphone.sound_level() |
0 (silent) to 255 (very loud) |
(A real micro:bit also has a compass, compass.heading(), and its gold logo is a touch sensor, pin_logo.is_touched(). Our board on the page doesn’t have those two.)
Light: a night light
A night light should come on when the room gets dark. The program reads the light level and compares it with a chosen number: below 50 counts as dark. A number that decides between two actions like this is called a threshold.
print works on the board too. On a real micro:bit, what a program prints is sent down the USB cable to the computer, and an editor shows it. This is called serial output, because the letters go one after another down a single wire. Programmers use it to watch a sensor’s numbers while they choose a threshold: a printed number is often the quickest way to find out what the board is really measuring.
In the night light, what happens if the threshold is changed from light < 50 to light < 200?
Pick an answer to see why.
Temperature: a thermometer
temperature() gives the temperature in degrees Celsius. The board has no separate thermometer: the sensor is inside the processor chip. So it measures the chip, which is close to the air’s temperature when the board isn’t working hard, and a little warmer when it is.
str(temperature()) turns the number into text, so that + can join it to " C" (Unit 1: a number and a string can’t be joined with + until the number is a string).
Movement: tilt and shake
The accelerometer (Grade 7: the sensor that turns a phone’s picture and counts steps) measures pushes and pulls in three directions, called x (left and right), y (forwards and back) and z (up and down). Even when the board is still, it feels the pull of gravity. Lying flat, all of that pull is along z, so x is 0. Tilted to the right, part of the pull is along x, and accelerometer.get_x() gives a positive number; tilted to the left, a negative one. Stood on its right edge, it gives about 1024, the whole pull of gravity.
A sudden jolt is a gesture the board recognizes: accelerometer.was_gesture("shake") answers True if the board has been shaken since the program last asked, just as was_pressed() does for a button. A board in a pocket or tied to a shoe gets a jolt with every step, which is how a simple step counter works.
Sound: is it too loud?
The micro:bit V2’s microphone measures how loud it is around the board, from 0 (silent) to 255 (very loud).
Which input is digital?
Pick an answer to see why.
Sound
The speaker makes a sound by moving back and forth very fast, pushing the air. How many times it moves back and forth in one second is the sound’s frequency, measured in hertz (Hz), like a processor’s clock in Grade 7: 440 Hz means 440 times a second. A higher frequency is a higher note.
The board’s sounds are in a module of their own, music, so a program that plays sound starts with import music as well:
music.pitch(440, 1000)plays 440 Hz (the musical note A) for 1000 ms.music.play(music.BA_DING)plays one of the board’s built-in tunes. Others aremusic.POWER_UP,music.JUMP_UP,music.BIRTHDAY,music.ODEandmusic.ENTERTAINER.music.play(["c4:4", "d", "e"])plays a list of notes, which you write. In"c4:4",cis the note,4its octave (c4is middle C), and:4how long it lasts: 4 ticks, which is half a second at the board’s normal speed. A note that leaves out the octave or the length keeps those of the note before it.
Note A in octave 4 ("a4") has a frequency of 440 Hz. What is the frequency of "a5", one octave higher?
Pick an answer to see why.
Designing a device
A device starts with a need, not with the board. Designing one goes in steps:
- The need. Who is it for, and what problem does it solve?
- Inputs and outputs. What must the device sense, and what must it do? Make a table.
- The rules, in words first: “when … then …”. Sketch the program on paper (Unit 3).
- Build the program a little at a time, running it after each part.
- Test it with chosen inputs (Unit 3): ordinary tests (the usual case), and edge tests (values just either side of each threshold, and the extremes). Write down what should happen before each test, then compare.
- Improve it, and test again.
Here is Sanjay’s first program. It looks right. Test it.
After fixing it, Sanjay tested it with chosen inputs. Before each test he wrote what should happen:
| Test | Light | Expected | Why this test |
|---|---|---|---|
| 1 | stays at 0 | count stays 0, no beep | ordinary: drawer shut |
| 2 | 0, then 200 for 3 seconds, then 0 | count 1, one beep | ordinary: open once, held open |
| 3 | 30, held | not counted | edge: exactly the threshold, and 30 > 30 is False |
| 4 | 31, held | count 1 | edge: just over the threshold |
| 5 | 0 → 200 → 0 → 200 → 0 | count 2 | ordinary: two openings |
| 6 | 255, then 0 | count 1 | edge: the brightest the sensor reads |
Real boards: the micro:bit and the Arduino
To put a program on a real micro:bit, you write it in an editor on a computer, then connect the board with a USB cable. The editor copies the program into the board’s storage; this is called flashing the board. Then unplug it and connect a battery pack (two AAA cells): the program starts and runs on its own, with no computer, wherever you put the board. There is also an app for phones, which sends the program to the board by Bluetooth.
The other board you will hear of most is the Arduino Uno. The classic Uno is a different kind of board: it has a microcontroller, rows of pins and a USB socket, but almost nothing built in: a few tiny LEDs and a reset button. You choose your own inputs and outputs (sensors, LEDs, a buzzer, a motor) and connect them to its pins with wires, usually on a breadboard, a plastic board full of holes joined in rows underneath, so parts can be connected and moved without soldering.
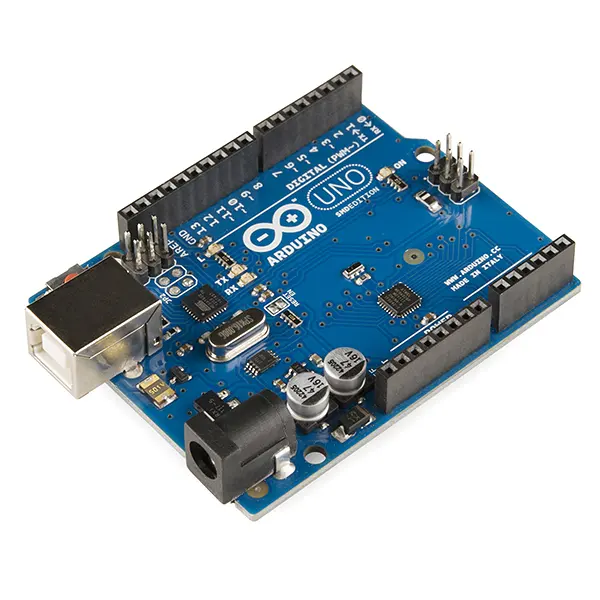
An Arduino is usually programmed in the Arduino language, which is based on C++, in a program called the Arduino IDE on a computer. Here is the first program most people run on one: it blinks the board’s tiny LED.
Blink.ino
void setup() { pinMode(LED_BUILTIN, OUTPUT);} void loop() { digitalWrite(LED_BUILTIN, HIGH); delay(1000); digitalWrite(LED_BUILTIN, LOW); delay(1000);}The words are different, but you can read it. setup() runs once, when the board starts: it makes the LED’s pin an output. loop() then runs again and again forever, like while True:. Inside, HIGH turns the LED on and LOW off, and delay(1000) waits 1000 ms, like sleep(1000).
| micro:bit | Arduino Uno (classic) | |
|---|---|---|
| built in | LEDs, buttons, sensors, speaker | almost nothing: you add your own parts |
| programmed in | MicroPython, blocks (MakeCode), JavaScript | the Arduino language (C++) |
| good for | starting quickly, with nothing to wire | building a real device with the exact parts it needs |
| runs on | 2 AAA cells, or USB | USB, a 9 V battery, or an adapter |
Both teach the same idea: inputs → program → outputs. Grade 9 and 10 go further, with more sensors and devices that talk to each other over the internet.
In short
Exercise
In a smoke alarm, which is the output?
Pick an answer to see why.
Which line lights the bottom-right LED as brightly as it can?
Pick an answer to see why.
What does sleep(250) do?
Pick an answer to see why.
Why does a board program usually have a while True: loop?
Pick an answer to see why.
A greenhouse fan should come on when the temperature goes above 30 °C. Which is the threshold?
Pick an answer to see why.
Which is an analog quantity?
Pick an answer to see why.
Explain these words, with an example of each: physical computing, sensor, microcontroller, threshold, polling.
Answer
Describe each device as inputs → program → outputs: i. an automatic hand dryer in a restaurant’s washroom, ii. a digital rice cooker, iii. a traffic light with a button for people on foot.
Answer
Draw a 5 × 5 grid and shade the LEDs this program lights. What picture is it?
from microbit import * display.show(Image("09090:09090:00000:90009:09990"))Answer
Write a program for the board that shows Image.YES while button A is held, Image.NO while button B is held, and nothing when neither is pressed. (Try it on the “Your device” board.)
Answer
What is the difference between button_a.is_pressed() and button_a.was_pressed()? Give a device for which each is the right choice.
Answer
A night light uses if light < 50: to switch on. At dusk, the light level goes up and down between 48 and 52 for several minutes, as clouds pass. What will the night light do? How could you make it better?
Hint
Answer
Design a device that warns when the air in a seedling nursery gets hotter than 35 °C. Give the need, a table of inputs and outputs, the rules in words, a program, and at least four tests with chosen inputs.
Answer
Write a dice for ludo: when the board is shaken, it shows a random number from 1 to 6.
Answer
Give three differences between a micro:bit and an Arduino Uno. What is the same about them?
Answer
Why must a device that switches a water pump be connected through a relay, and why should a student never wire a board to the mains?
Answer
Quiz yourself: Computer systems, Grades 6–12 →
Practice every question in the book, and keep track of the ones you miss →