
Schools across Nepal practice earthquake drills, all the more since the 2015 earthquake: drop to the floor, take cover under a desk, hold on until the shaking stops. Imagine a game that teaches the same thing. The ground shakes, and you have three seconds to choose: run down the stairs, stand by the window, or get under the table? Choose well and your score goes up; choose badly and the game shows you why. Could you build that game yourself, this year, without years of training?
You could, with block programming. Instead of typing lines of code, you snap colored blocks together like pieces of a jigsaw puzzle: “when the green flag is clicked”, “say Drop, cover, hold on!”, “if the answer is table, add 1 to the score”. The blocks only fit together in ways that make sense, so you can spend your time on the idea, not on missing brackets. In this unit you will learn Scratch, the most popular block programming tool, build a game in it, and meet two small computers you can hold in your hand and program with blocks: the micro:bit and the Arduino UNO.
3.1 Concept of block programming
Nearly everything a computer does, it does because someone gave it instructions. A game, a smartwatch, Google Classroom, Duolingo, a phone’s calculator: each is a set of instructions, written by people, that tells the device exactly what to do and in what order. Writing those instructions is called programming, and a set of them is a program. Learning to program lets you understand how the devices around you work, and make them do what you want, which is why it is such a useful skill.
Most programs are written in a text-based programming language such as Python, Java or C. You type each instruction, and every character matters: a missing bracket, a misspelled word or a wrong space, and the program stops with an error. For a beginner this can feel like learning a language with a thousand strict rules before you can say anything at all.
Block programming is a friendlier way in. The name has two parts. Blocks are like the pieces of a jigsaw puzzle that join to make a picture. Programming is giving a computer or an electronic device instructions about what to do. So block programming is a way of programming in which you build a program by dragging and dropping colored blocks, each block one instruction, and snapping them together in order. You don’t type the instructions; you choose them, ready-made, and their shapes only fit together where they make sense.
Block programming is used mainly to teach beginners, especially children, the basics of programming. With it they build programs, animations, stories and games, with graphics and sound, without first learning the rules of a text-based language. The best-known block programming tools (also called platforms or environments) are Scratch, Blockly and Snap!.
Here is one small program, built from blocks in Scratch and then written in Python, a text-based language you will learn in Unit 7. Both ask your name and then greet you.
name = input("What's your name? ")print("Hello, " + name)The two do the same job. In Python you must remember the words input and print, put brackets and quotes in the right places, and use + to join the texts; in Scratch you pick the blocks from a palette and snap them together, and you can’t put a block where it doesn’t fit.
Which of the following is an example of block programming?
Pick an answer to see why.
Advantages of block programming
- a.No syntax errors. Syntax is a programming language’s grammar: its rules for spelling, brackets and punctuation. With blocks, you don’t have to worry about it; a block either fits or it doesn’t.
- b.More time for ideas. Free from typing and syntax, you spend your time on creativity, on building the program’s logic (what should happen, and in what order) and on solving problems.
- c.Fewer typing mistakes. You don’t type the code, so you can’t misspell it.
- d.Colorful and engaging. The blocks are colored by what they do, and you see the result at once, which makes programming appealing to beginners and children.
- e.A step to text-based programming. The ideas you learn with blocks (sequence, loops, conditions, variables, events) are the same in every language, so moving to Python or another text-based language later is much easier.
Block programming and text-based programming
| Block programming | Text-based programming |
|---|---|
| Programs are built by dragging and snapping blocks together. | Programs are typed, character by character. |
| No syntax errors: blocks only fit where they make sense. | A missing bracket or misspelled word stops the program. |
| Each block shows its command in words; colors show its category. | You must remember the commands and their rules. |
| Made for beginners and learning; quick to see results. | Used by professionals for programs of every size. |
| Large programs become hard to manage: a big script fills the screen. | Large programs are easier to organize, search and share. |
| Examples: Scratch, Blockly, Snap!, MakeCode. | Examples: Python, Java, C, JavaScript. |
Which is the main reason a beginner makes fewer errors in block programming than in a text-based language?
Pick an answer to see why.
Applications of block programming
Because it is easy to start with, block programming is used in many fields.
- a.Education. Schools and coding clubs teach programming with blocks. Students build a strong foundation, and move on to text-based languages later. Code.org’s Hour of Code puzzles, played by millions of students around the world, are built with Blockly.
- b.Game development. Users create characters and other elements and program the game’s logic, how the player moves, scores and wins, without worrying about complex code. Most projects shared on the Scratch website are games.
- c.Mobile app development. With block tools such as MIT App Inventor, users design an app’s screens (its user interface: buttons, text boxes, pictures), define what each part does, and join code blocks to make apps for Android and iPhone.
- d.Robotics. Blocks can program robots: how they move, how they behave, and how they use their sensors (parts that measure light, distance, sound and so on). Boards such as the micro:bit and Arduino UNO, which you will meet in this unit, can be programmed with blocks for robot projects. Students learn while building, and grow interested in robotics.
- e.Web development. Some tools let users build interactive web pages from blocks: the elements on the page, what happens when someone clicks, and how data is handled. Code.org’s App Lab, for example, builds a web app from blocks and can then show the same program as JavaScript. This is a bridge to text-based web languages, which you will meet in Unit 4.
- f.Creative projects. Artists and students make animations, interactive stories, music and moving art from blocks. Millions of such projects are shared on the Scratch website.
- g.Modeling and simulation. Modeling and simulation is using a model of a real system (a set of rules for how it behaves) to see what would happen, make data, and predict. With blocks you set the model’s parameters (the numbers you can change), how its parts interact, and the scenarios to try: how a disease spreads through a school, how traffic jams form at a junction, how fast a ball falls. MIT’s StarLogo Nova builds simulations like these from blocks.
- h.Data science and visualization. Blocks can arrange data, analyze it, and show the results as interactive charts and graphs. Snap!, for example, can work with tables of thousands of rows and draw them as charts.
A teacher wants students to make a phone app that tells them the day’s class routine. Which block programming tool is made for building mobile apps?
Pick an answer to see why.
3.2 Introduction to Scratch
Scratch is the most popular block programming language. It was developed by the Lifelong Kindergarten Group at the MIT Media Lab (MIT is the Massachusetts Institute of Technology, in the United States), and it is free and open source: anyone can use it without paying, and its code is public for anyone to read and build on. It has a large, friendly community of users, who share their projects and help each other on the Scratch website.
Scratch is a real software development tool with a colorful interface. You can make games, animations, stories, quizzes and music, and even control robots and gadgets. It is fun, but it isn’t only a toy: you meet the same challenges a professional programmer meets, of building logic and solving problems.
Here is a first Scratch program. It makes the cat move a little and then say “Namaste!” in a speech bubble.
In this section you will learn where to find Scratch and how its screen is laid out; in 3.3, how to build programs like this one.
Downloading Scratch on a computer
Scratch can be used offline, with no internet, once its app is installed. To install it:
- Open a web browser and go to https://scratch.mit.edu/download.
- Download the Scratch app for your computer’s operating system. On Windows, open the downloaded .exe file to install it.
- When it has installed, open the Scratch app. You will see the Scratch editor (its screen is shown in Figure 3.3); it may look slightly different in a different version.
Using Scratch online on a computer
You can also use Scratch online, in a web browser, at https://scratch.mit.edu. Click Create at the top, and the editor opens, ready to start a project. You can try anything without an account, but to save your work on the website or share it, you need one. Click Join Scratch at the top right and fill in the form; afterwards, Sign in with the same username and password.
Scratch on a tablet
Scratch also runs on tablets. The Scratch app for Android tablets comes from the device’s app store (Google Play); once installed, it works like the computer app. On any tablet, the website’s editor also works in the browser. A phone’s screen is too small for the full editor; for young children, the separate ScratchJr app runs on tablets.
Features of Scratch
Scratch is a visual programming language: a language whose programs are built from pictures (here, blocks) rather than typed text. It is useful for beginners, students, programmers and content creators, and it develops creative thinking, logical reasoning and working together. Its main features:
- a.Drag-and-drop interface: code is built by dragging blocks and joining them.
- b.Event driven: scripts start when something happens (an event): a click on the green flag or on a sprite, a key being pressed, a message being received.
- c.Data and variables: variables store data (a score, a name, a level) and change it while the program runs.
- d.Loops and conditions: blocks such as repeat, forever and if… then… else control the flow of the program, the order in which its blocks run.
- e.Sound: sounds and music, from Scratch’s library or recorded yourself, make projects lively and interactive.
- f.Community sharing: projects can be shared on the Scratch website, where anyone can play them, see how they work inside and remix them (make their own version, with credit to the maker).
The Scratch interface
The Scratch editor is colorful and the same online and offline. Its four main components are the stage, the sprites, the blocks palette and the scripts area. Figure 3.3 shows where every part is.
- a.Stage: where you see your program’s result: the sprites move, talk and play on it. Click the green flag to run the program. The stage is a rectangle 480 steps wide and 360 high.
- b.Sprite: each object that performs actions on the stage is a sprite. A new project starts with one, the Scratch cat; you can add others, or replace it, with Choose a Sprite. Each sprite has its own scripts, costumes and sounds.
- c.Blocks palette: like a painter’s palette of colors, it holds all the blocks, grouped by color into categories (the colored circles on its left). You drag blocks from here to program your sprites.
- d.Scripts area (or code area): where you drop the blocks and join them into scripts, your program. Each sprite has its own scripts area; click a sprite to see its scripts.
- e.Extensions library (the Add Extension button at the bottom left): adds more categories of blocks for extra features, such as Music, Pen (to draw), Text to Speech, Translate and micro:bit.
- f.Costumes tab: the paint editor, where you draw your own sprites or change a sprite’s costumes (the different pictures a sprite can show, such as a cat with its legs in different positions, to make it look as if it walks).
- g.Sounds tab: where you add, record and edit the sounds of a sprite or the stage.
- h.Sprite info pane (the sprite pane): shows every sprite in the project, so you can click the one to program; above them, the chosen sprite’s name, its position (x and y), whether it is shown, its size and its direction.
- i.File menu: start a new project, load one from your computer, or save one to your computer.
- j.Choose a Sprite: adds a sprite from Scratch’s library of several hundred (animals, people, objects, letters), or lets you paint your own, upload a picture, or get a surprise.
- k.Choose a Backdrop: a backdrop is the picture behind everything on the stage, like the scenery in a play. This button adds one from the library, or lets you paint or upload your own.
- l.Project name: the title of your project; click it to change it.
- m.Green flag: the play button. Scripts that start with when green flag clicked run when you click it; the red stop sign beside it stops everything.
- n.Backpack: a store for scripts, sprites, costumes and sounds that you want to use again in other projects (online, when signed in).
Which is the character that performs actions on the stage of the Scratch window?
Pick an answer to see why.
Where in the Scratch editor do you join blocks together to make a script?
Pick an answer to see why.
3.3 Blocks in Scratch
Concept of a block
In Scratch, a program is built from blocks. Each block is one command or action, already written for you, shown as a colored piece with its words on it. You drag blocks into the scripts area and snap them together to make a list of things to do, like building with toy bricks. To make a character move, or jump, or speak, you pick the blocks that do those things and join them in order.
Blocks have shapes, and the shape tells you how a block is used:
- Hat blocks, rounded on top, start a script; nothing can go above them. Almost every script starts with one, such as when green flag clicked.
- Stack blocks, with a notch on top and a bump underneath, are the commands. They stack one under another and run from the top down.
- C blocks, shaped like the letter C, wrap around other blocks: repeat, forever, if… then.
- Reporter blocks, rounded at the ends, hold a value (a number or text) and fit inside other blocks’ white spaces: answer, x position, (10) + (10).
- Boolean blocks, pointed at the ends like a hexagon, are true or false, and fit in the pointed spaces of blocks such as if: key space pressed?, touching Dustbin?.
- Cap blocks, flat underneath, end a script; nothing can go under them: stop all, delete this clone. The C block forever is flat underneath too, since a loop that never ends has no “next”.
The white ovals in a block are values you can change: click one and type a new number or word. A small ▼ opens a menu of choices.
Where a sprite is: x and y
Many blocks move a sprite to a place, or ask where it is. Scratch names every place on the stage by two numbers, as on a graph: x, how far right (or, if it is negative, left) of the middle; and y, how far up (or, if negative, down). The middle of the stage is x = 0, y = 0.
So change x by 10 moves a sprite 10 steps to the right, change x by −10 10 steps to the left, and change y by −5 5 steps down. set y to 180 puts it at the top edge.
Components of Scratch: the nine categories of blocks
The blocks are the main component of Scratch and what makes it different from a typed language: ready-made pieces of code, each with its own job, shown as colored shapes that join like puzzle pieces. The blocks palette groups them, by what they do, into nine categories, each with its own color:
- Motion (blue)
- Looks (purple)
- Sound (pink)
- Events (yellow)
- Control (orange)
- Sensing (light blue)
- Operators (green)
- Variables (dark orange)
- My Blocks (red)
The examples below use the cat, the sprite every new project starts with.
1. Motion blocks
Motion blocks make a sprite move, turn, point in a direction or glide smoothly across the stage. They also set or change its position (x and y), its direction, and its rotation style (whether it turns all the way round, only faces left and right, or doesn’t turn). Examples: move (10) steps, turn ↻ (15) degrees, turn ↺ (15) degrees, go to x: () y: (), glide (1) secs to random position, point in direction (90), change x by (10).
The turtle below is moved by Motion-like blocks too: move goes forward, turn turns it. Try changing the numbers and running it.
2. Looks blocks
Looks blocks change how a sprite looks: its costume (picture), its color and other graphic effects, its size, and whether it is shown or hidden. They also make a sprite say or think something in a bubble. Examples: say (Hello!) for (2) seconds, think (Hmm…), switch costume to (), next costume, change size by (10), set (color) effect to (0), show, hide.
3. Sound blocks
Sound blocks play and stop sounds and change their volume. With the Music extension a sprite can also play a note or a drum, and in the Sounds tab you can record your own sound with a microphone. Examples: play sound (Meow) until done, start sound (Meow), stop all sounds, change volume by (−10).
4. Events blocks
Events blocks start scripts when something happens: when the green flag is clicked, when a key is pressed, when this sprite is clicked, when the backdrop changes, or when a message is received (sprites can send each other messages with broadcast). They are hat blocks: they go on top of a script.
A program can have many scripts, each under its own event block, each waiting for its own event. This one draws as you steer it with the arrow keys:
5. Control blocks
Control blocks control the flow of a script: they make it wait, repeat some blocks, or stop. They also make decisions with conditional blocks such as if… then, if… then… else and wait until, which make a sprite do something only when a condition is true. Examples: wait (1) seconds, repeat (10), forever, if <> then, if <> then… else, wait until <>, repeat until <>, stop (all).
6. Sensing blocks
Sensing blocks let a sprite find out about the world around it: whether it is touching another sprite, the mouse pointer, the edge of the stage or a color; whether a key is pressed or the mouse button is down; how far away something is; how long the program has run (the timer). They also ask a question and wait for the user to type an answer. Most are reporter or boolean blocks that fit inside other blocks. Examples: touching (mouse-pointer)?, touching color ()?, key (space) pressed?, mouse down?, ask (What’s your name?) and wait, answer, timer, distance to (mouse-pointer).
7. Operators blocks
Operators blocks do calculations: add, subtract, multiply and divide, find a remainder (mod), round, and pick a random number. They compare values (greater than, less than, equal to) and combine conditions with and, or and not. They also work with text: join two pieces of text, take a letter of a word, or find its length. Examples: () + (), () − (), () × (), () / (), pick random (1) to (10), () > (), () < (), () = (), join (apple) (banana).
8. Variables blocks
A variable is a named place in the computer’s memory that holds a value, such as a score, a name or a level, which can change while the program runs. Variables blocks create variables (Make a Variable), set a variable to a value, change it by an amount, and show or hide it on the stage. The orange reporter with the variable’s name gives its value. Scratch can also make a list, a variable that holds many values in order. Examples: set (my variable) to (0), change (my variable) by (1), show variable (my variable).
The program below is the same one, in blocks you can run. Press Run, type your name, and watch the variables fill in.
Which blocks help you store data?
Pick an answer to see why.
9. My Blocks
My Blocks let you make custom blocks of your own. Click Make a Block, give it a name and, if you like, inputs (values it takes, like the numbers in move (10) steps). A define block appears; join under it the blocks your new block should run. Use custom blocks to group blocks you need many times, so you build them once and use them everywhere, or to make a new block that does one job, which makes a big program easier to read.
Demonstration: the dustbin game
Now that you know Scratch’s components, let’s use them to build a game. In the dustbin game, rubbish (bottles, cans, paper) falls from the sky over a busy town street, and you move a dustbin left and right with the arrow keys to catch it. Each piece caught adds 1 to the Score.
Step 1: the sprites. A new project starts with the cat. Delete it in the sprite pane (click it, then its bin icon). Click Choose a Sprite and add sprites from the library for the rubbish (a bottle, a can, a ball of paper), and paint your own sprite for the dustbin (a red trapezium with the word Dustbin on it, in the paint editor of the Costumes tab).
Step 2: program the dustbin. Click the dustbin in the sprite pane and build its two scripts, Figure 3.17. Find each block in the palette by its color: when green flag clicked is an Events block, yellow; hide and show are Looks blocks, purple; and so on.
The dustbin: moving
The dustbin: music
Step 3: program the rubbish. Click each piece of rubbish in turn and give it the two scripts of Figure 3.18. Build them once, then drag the scripts onto the other rubbish sprites in the sprite pane to copy them.
Each piece of rubbish: scoring
Each piece of rubbish: falling
Step 4: a backdrop. Click Choose a Backdrop and pick one from the library, or paint your own: a street of your town, a temple square, mountains.
Step 5: save your project, to play it later or share it. Online: sign in to your account; then Save Now appears in the menu bar at the top, and Share puts it on the website for others to play. Offline: click File → Save to your computer, and the project is saved as a .sb3 file.
Step 6: play. Click the green flag and catch the rubbish!
Here is the game, run by exactly these scripts. The only change: our three pieces of rubbish wait 2, 3 and 4 seconds, not all 2, so they don’t fall side by side. With the same scripts, the same numbers in every sprite, they would start and fall together, in a row.
3.4 Concept of micro:bit
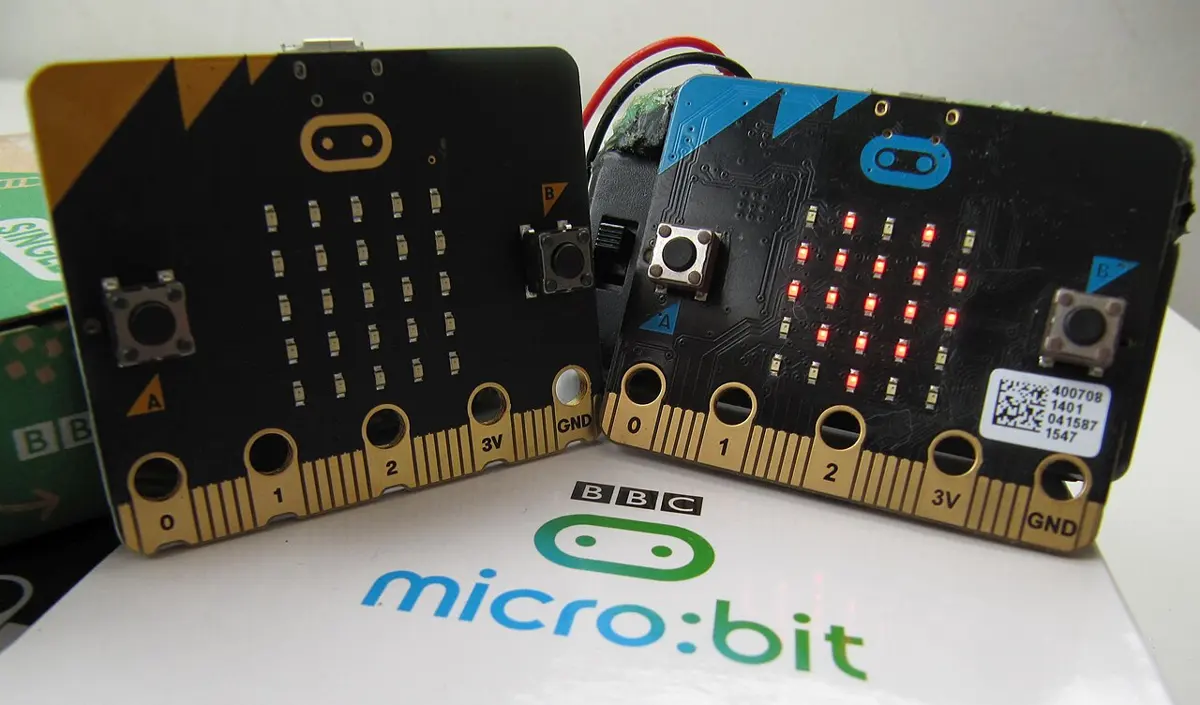
The micro:bit (written micro:bit, with a colon) is a small computer board, about 5 cm by 4 cm, smaller than a calculator, that you can program to make interactive projects: games, a torch, a robot, Tihar lights that twinkle. It was designed for learning how programs and hardware (sensors, lights, motors) work together. Making projects that sense the world and act on it like this is called physical computing.
History of micro:bit
The micro:bit is also called the BBC micro:bit. It was made as part of an education project in the United Kingdom led by the BBC (British Broadcasting Corporation), announced in 2015, which aimed to encourage young people to be creative with technology and to learn programming. In 2016 about a million micro:bits were given free to students in their first year of secondary school across the UK. It was a joint effort of around thirty organizations, among them the BBC, ARM (who design the processors in most phones), Microsoft (who made its block editor) and Samsung, with universities and education partners. They designed it to be simple and cheap, so that students could learn coding and electronics in a practical, hands-on way. Since 2016 a not-for-profit organization, the Micro:bit Educational Foundation, has looked after it, and today it is used in schools in many countries.
Components of micro:bit
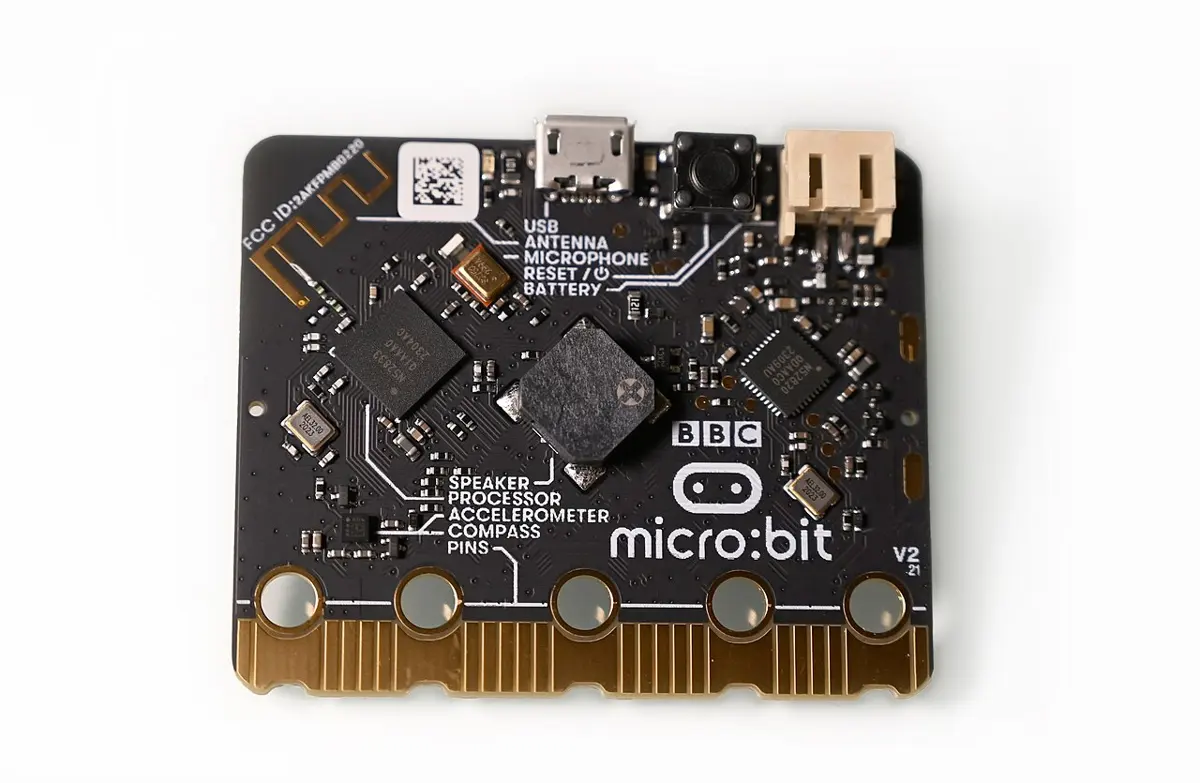
These are the parts that make physical computing possible on a micro:bit:
- a.Microcontroller: the board’s processor, a whole tiny computer on one chip, with its own memory. It runs the program you put on the board and controls all the other parts.
- b.5 × 5 LED matrix: a grid of 25 small lights (LEDs, light-emitting diodes) that shows text, numbers, pictures and animations. Text too long for 5 × 5 scrolls across.
- c.Sensors: parts that measure the world around the board. It senses light (with its LEDs), temperature (inside its processor), movement (an accelerometer, which feels tilting, shaking and falling) and direction (a compass).
- d.Physical computing: making systems that interact with the real world, combining hardware (sensors, lights, motors) with software to make interactive things, such as robots and wearable technology (smartwatches, fitness trackers, augmented reality glasses, health monitors). This is not a part of the board, but what all its parts are for.
- e.Buttons: two buttons, A and B, which the program can react to when pressed. The V2 also has a touch logo at the top that works as a third button.
- f.Microphone and speaker (V2): the microphone detects sound and how loud it is (its small light comes on while it listens); the speaker on the back plays sounds and music.
- g.Pin connector (the edge connector): the gold strips along the bottom, with five large holes (pins 0, 1, 2, 3V and GND), for connecting wires, crocodile clips or other components to the micro:bit: a motor, a bigger light, a soil moisture sensor.
A microcontroller is a tiny ______.
Pick an answer to see why.
Programming a micro:bit with blocks
A micro:bit is programmed on a computer, most often in Microsoft MakeCode, a free block editor in a web browser, at makecode.microbit.org. Its blocks look like Scratch’s. MakeCode shows a drawn micro:bit, a simulator, that runs your program on the screen, so you can test it without a board. To put the program on a real micro:bit, you connect the board to the computer with a USB cable and download the program (a .hex file) onto it; the board then runs it by itself, from a battery pack too.
In MakeCode the show leds block holds a 5 × 5 grid: tick the squares, and the LEDs at those places light up. Put it inside an event block such as on button A pressed, and the picture appears when button A is pressed.
Applications of micro:bit
The micro:bit is used in many fields. Some examples:
- Education: its sensors, LEDs and radio (micro:bits can send messages to each other wirelessly) give students hands-on practice in coding and electronics, from games to useful gadgets.
- Fitness: small and light, it can be worn: strapped to a shoe or wrist, its accelerometer counts steps. Step counters, fitness games and workout timers are common projects.
- Games: with its buttons, sensors and LEDs it makes small games: rock-paper-scissors (shake it, and it shows a random rock, paper or scissors), a maze, a dice (shake it for a number from 1 to 6).
- Fashion: designers sew micro:bits into clothes, bags and wearables, with LEDs that light up, or respond to movement or sound.
- Music: its speaker plays tunes and beats, and its pins make instruments: a banana piano, with a crocodile clip on each banana, plays a note when you touch a banana. A voice changer and a jukebox are popular projects on the micro:bit website.
- Cooking: not made for the kitchen, but useful there: an egg timer, a thermometer to check a temperature, or a screen that scrolls a recipe.
- Home and garden: smart-home gadgets such as temperature monitors and lights that switch on by themselves; and smart gardening: checking the soil’s moisture through its pins, measuring sunlight, or switching on a pump to water plants.
3.5 Concept of Arduino UNO
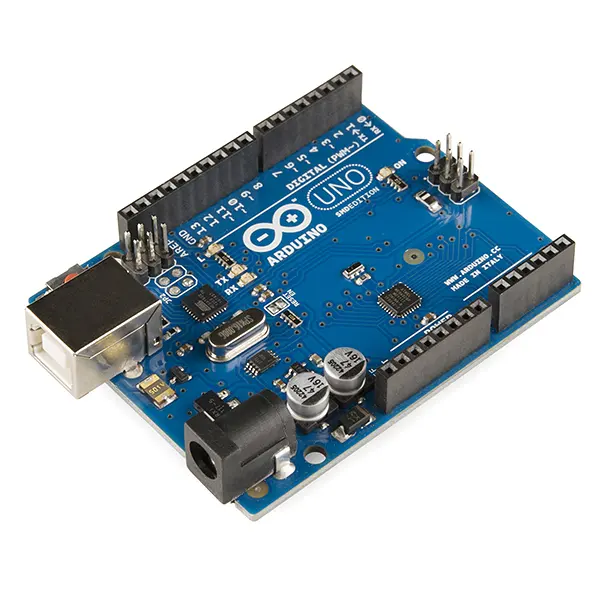
The micro:bit is made for beginners and classrooms, with its lights, buttons and sensors built in. The Arduino UNO is a microcontroller board for a wider range of projects: LED lights, robot vehicles, temperature sensors, automatic doors. It has no lights or sensors of its own (except a few small indicator lights); instead it has many pins, where you connect the parts your project needs. It is the most common and widely used Arduino board, one of a family of boards whose designs and software are open source.
History of Arduino
Arduino began in 2005 at the Interaction Design Institute Ivrea, a design school in the town of Ivrea, Italy. Its students needed a cheap, easy way to build things that sense and respond (lights, motors, interactive art) without being electronics engineers, and the boards then available were expensive and hard to use. A group of teachers and students, Massimo Banzi, David Cuartielles, Tom Igoe, Gianluca Martino and David Mellis, made one: a simple board with free, open source software, so students could learn programming and electronics together and apply them to real problems. They named it after a café in Ivrea where they met, the Bar di Re Arduino, itself named after Arduin, a king of Italy a thousand years ago. The UNO board came out in 2010 and became the most popular Arduino of all.
Types of components in Arduino UNO
The components of an Arduino UNO can be grouped in two parts: hardware and software.
a. Hardware. The UNO’s microcontroller, the board’s “brain”, is the ATmega328P. Around it are:
- 14 digital pins (0 to 13), each of which can be an input (reading a button: on or off) or an output (switching an LED or buzzer on or off);
- 6 analog input pins (A0 to A5), which read values that change smoothly, such as how bright it is or how far a knob is turned, as a number from 0 to 1023;
- a USB port, to connect it to a computer, for power and to receive programs;
- a power jack, for a battery or adapter of 7 to 12 volts when it isn’t connected to a computer;
- a reset button, which starts the program again from the beginning;
- a built-in LED (marked L), connected to pin 13, useful for testing;
- a crystal oscillator, a clock that ticks 16 million times a second (16 MHz). On the UNO R3 the oval metal crystal times the USB interface chip, and a tiny resonator beside the ATmega328P, also 16 MHz, times every step the microcontroller takes;
- a voltage regulator, which turns the supply into a steady 5 volts for the chips.
b. Software. The UNO is programmed with the Arduino IDE (Integrated Development Environment), a free program for the computer. In it you write the code for your board, called a sketch, in the Arduino language (C++ with ready-made commands), and upload it to the board through the USB cable. Extra features come from libraries: ready-made sets of code, for example to control a motor or read a particular sensor, that you add to your sketch instead of writing everything yourself.
The first program almost everyone runs on an Arduino makes the built-in LED blink:
Blink.ino
void setup() { pinMode(13, OUTPUT); // pin 13 (the L light) is an output} void loop() { // loop() runs again and again, for ever digitalWrite(13, HIGH); // LED on delay(1000); // wait 1000 milliseconds: 1 second digitalWrite(13, LOW); // LED off delay(1000);}setup() runs once, when the board starts; loop() then runs again and again, like Scratch’s forever.
Applications of Arduino UNO
The Arduino UNO is versatile and easy to use, so it is used in many fields:
- a.Education: it is widely used to teach electronics and programming together, with a simple, friendly way of programming.
- b.Home: in home automation: lights that switch on when someone enters, a fan that turns on when the room is hot, a water-tank alarm, and controlling other appliances.
- c.Robotics: making and testing robots; it controls motors, reads sensors and drives other robot parts. A robot car that avoids walls is a popular first robot.
- d.Wearable technology: gadgets such as a simple digital watch or a step counter. The UNO itself is a bit large to wear, so makers often move a working project to a smaller Arduino board, such as the Nano or the round LilyPad, which is sewn into clothes.
- e.Data gathering: with sensors it collects data: temperature, humidity and air quality for monitoring the environment, motion detection, and GPS tracking with a GPS module.
- f.Gaming: simple games and game controllers, a fun way of learning programming and electronics together.
- g.Audio projects: music controllers, sound installations, an electronic drum, or a “walking piano”, a floor mat whose steps play notes.
- h.Testing products: engineers use Arduino to try out an electronic idea quickly (a prototype) before designing the final, more complex hardware.
Lab activities and project work
Exercise
1. Write the full forms of the given abbreviations
a. MIT b. LED c. IDE d. UNO e. BBC
Answer
2. Choose the best answer
To make your program run and give its results, you can use an event block called ________.
Pick an answer to see why.
The background image in the stage area is called a ________.
Pick an answer to see why.
Which type of block in Scratch is used to repeat actions?
Pick an answer to see why.
What is the main use of Sensing blocks in Scratch?
Pick an answer to see why.
There are ____ extensions in Scratch’s extension library.
Pick an answer to see why.
ask What’s your name? and wait is an example of a ________ block.
Pick an answer to see why.
Which block in MakeCode, the micro:bit’s block editor, is used to display a picture or pattern on the LED matrix?
Pick an answer to see why.
What are devices like micro:bit and Arduino used for?
Pick an answer to see why.
3. Write short answers to these questions
What is Scratch?
Answer
List the components of the Scratch interface.
Answer
What is a micro:bit? Give any two applications of micro:bit.
Answer
How does a micro:bit help in physical computing?
Answer
What is ATmega328P?
Answer
4. Write long answers to these questions
Define block programming, and describe its features.
Answer
What are the applications of block programming? Explain in brief.
Answer
How is block programming different from traditional text-based programming?
Answer
What are blocks in block programming? Describe the block components of the Scratch programming language.
Answer
What is an Arduino UNO? Write down its types of components.
Answer
What is a microcontroller? What is it used for?
Answer
You are given a program in which the cat sprite turns 90° and says “Namaste” when the sprite is clicked. List and explain the blocks used in this program.
Answer
Practice every question in the book, and keep track of the ones you miss →
A companion to your textbook, not a replacement for it: study from the book your school uses, and where the two differ, follow your teacher. Found a mistake? Please tell us.